AirPods are very popular, and frankly, it’s no surprise since you can make calls, listen to music, and even use Siri with them. Just stop in the middle of a busy street, look around you for a while, and then notice how many people are using them. To use AirPods, you must set them up with your iOS device, Mac, or any other Bluetooth device (YES! including Android phones). However, if you are trying to use it on Android or any other non-Apple device, you might not get all the features.
Several Apple users have reported that they can’t hear any sound in their AirPods, among other problems. In other words, the AirPods have stopped playing any sound from the iOS device without warning. If you are experiencing the same issue, there is no need to panic because you’re not alone.
This article explains what to do when there is no audio even though your device indicates a connection, from basic troubleshooting to resetting your AirPods.

1.-Clean your Airpods
When was the last time you properly cleaned your AirPods? By properly, I don’t mean wipe your AirPods with a T-shirt or any cloth within your reach. You must clean them properly so that you do not damage them. Apple explains how to clean your beloved Airpods the right way.
2.-Turn your Bluetooth ON
Way to obvious, but still worth checking. Go to your settings, then Bluetooth. Toggle the Bluetooth on. If Bluetooth is already on, turn it off and wait around 5-10 seconds. Turn it back on.
3.-Make sure your AirPods are charged
You can’t expect sound if there’s no power, can you? Just place them in the case for a few hours to charge them.
4.-Update your device
If Apple releases new updates for AirPods, it automatically gets updated when the paired iPhone or iPad has a Wi-Fi connection. Now you have to search for iPhone or iPad updates. If any update is pending, make sure to install it.
- Settings > General > Software Update.
5.-Check volume limit
There is a setting on your iPhone that can limit the maximum level of volume that you can hear. This is a maximum level setting, and you may have set this too low (this is off by default). So check the level or turn it off to get the maximum volume.
- Settings > Music > Volume Limit.
6.-Reset your Airpods
Some users solved the problem with this. To reset your AirPods, follow the steps:
- Put AirPods in their case.
- Close the lid and wait 30 seconds, then open the lid.
- “On your iOS device: Go to Settings > Bluetooth and tap the”i” icon next to your AirPods.Then tap Forget This Device and tap again to confirm.”On your iOS device: Go to Settings > Bluetooth and tap the “i” icon next to your AirPods.Then tap Forget This Device and tap again to confirm.
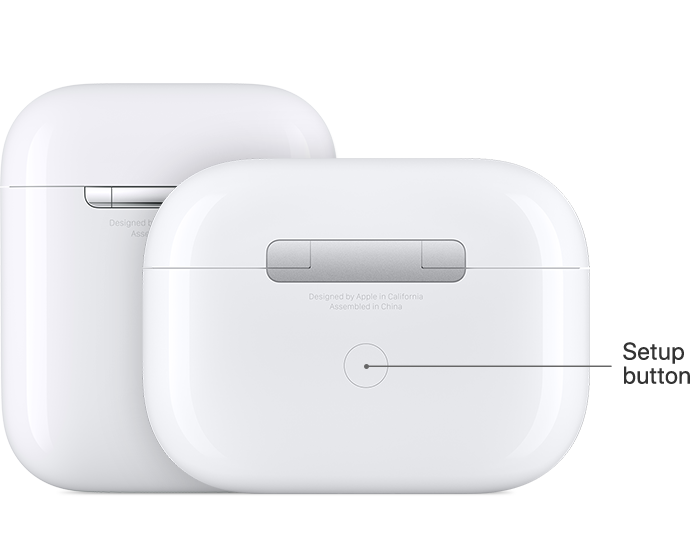
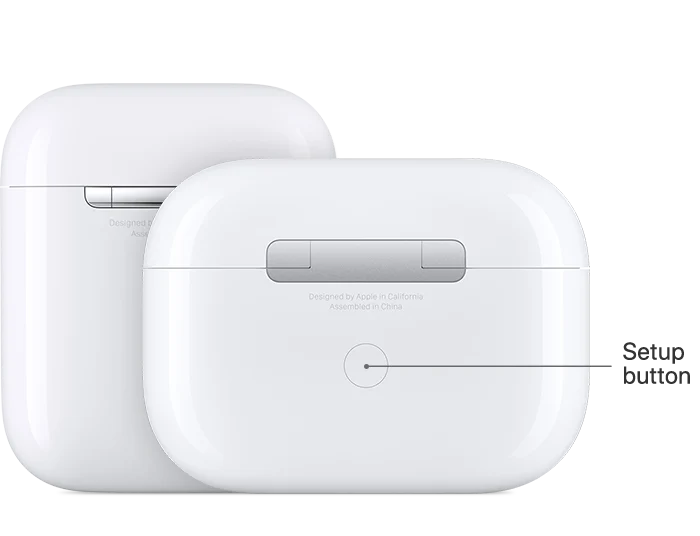
- Press and hold the Setup button for 15 seconds until the status light flashes orange.
- Now reconnect your AirPods by placing them close to your device. Follow the steps on your device’s screen.
Note step 3: If you don’t see your AirPods in Settings > Bluetooth, go to the next step.
7.-Disable Automatic Detection
You can turn off your iPad or iPhone’s Automatic Ear Detection feature. Now turn it off and check if the problem persists or not.
- Settings > Bluetooth > AirPods > Disable Automatic Ear Detection.
8.-Reset network settings
If you followed the steps above and still have issues, it may be a connectivity issue. When you reset network settings, all the Bluetooth, WI-FI networks, and call settings will be removed.
- Settings > General > Reset Network Only.
Set your Bluetooth connection with your iOS device after your device reboots.
What to do if none of the above works?
Are your Airpods connected but still got no sound? In that case, you can always contact Apple support or Replace your AirPods. If you solved this issue with another solution not mentioned above, please tell us in the comment section. We will update this article according to that.
How long do AirPods last?
AirPods have a relatively long lifespan, but the exact duration varies depending on various factors. On average, AirPods typically last between two to three years before they may start experiencing some decline in performance. However, with proper care and maintenance, some users have reported their AirPods lasting even longer.
The longevity of AirPods largely depends on the battery life. Like any rechargeable device, AirPods’ battery health gradually deteriorates over time. After around two years of regular use, you may notice that the battery lifespan of your AirPods has decreased, requiring more frequent charging.
Factors such as usage patterns, charging habits, and overall care can significantly impact the lifespan of AirPods. Excessive use, frequent exposure to extreme temperatures, and charging habits that involve consistently draining the battery to zero or keeping it fully charged can accelerate the wear and tear process.
To prolong the lifespan of your AirPods, it’s recommended to follow some best practices. Avoid exposing them to extreme temperatures, both cold and hot, as this can negatively affect the battery. It’s also important to clean them regularly, removing any debris or earwax buildup, as this can impact sound quality and overall performance.
It’s worth noting that even after the battery life starts to decline, you can still continue using AirPods. However, you may notice a reduced playback time and the need to charge them more frequently.
Ultimately, how long your AirPods last depends on how you use and care for them. By adopting good maintenance practices and being aware of the signs of battery degradation, you can maximize their lifespan and enjoy your AirPods for an extended period.
How do I update my PC?
To update your PC and ensure it is operating optimally, follow these steps:
1. Begin by navigating to the bottom left corner of your screen, where you’ll find icons for Wi-Fi, Sound, and Battery. Left-click on this area to open the Quick Access menu.
2. Within the Quick Access menu, locate and click on the “gear” icon. This will open the Settings menu.
3. In the Settings menu, scroll down and find the option labeled “Windows Update.” Click on it.
4. Once you’ve opened the Windows Update section, check for any available updates by clicking on the “Check for updates” button. This will prompt your PC to search for any pending updates.
5. If updates are found, click on the “Install updates” button to begin the installation process. If no updates are found, your PC is already up to date.
It is recommended to regularly check for and install updates to keep your device functioning properly and to take advantage of the latest enhancements and security patches.
How do I set my AirPods as the output device on Windows 11?
To set your AirPods as the output device on Windows 11, follow these steps:
1. Ensure that your AirPods are already paired with your PC.
2. Locate the speaker icon, usually situated in the bottom left corner of your screen, and left-click on it.
3. A pop-up menu will appear, where you should select “Open volume mixer.” This will open the volume mixer settings.
4. Within the volume mixer settings, you will find an option labeled “Output device.” Click on this option.
5. A list of available output devices will be displayed. Locate and select your AirPods from the list.
Once you have completed these steps, your AirPods will be set as the default output device for audio on your Windows 11 PC. This means that sound from any applications or programs on your computer will be routed to your AirPods, allowing you to enjoy audio playback wirelessly and directly through your AirPods.
How do I set my AirPods as the output device on Windows 10?
To set your AirPods as the output device on Windows 10, follow these steps:
1. Start by pairing your AirPods with your PC. You can do this by opening the Bluetooth settings on your computer and selecting the option to pair a new device. Ensure that your AirPods are in pairing mode, usually done by pressing and holding the button on the back of the AirPods charging case.
2. Once your AirPods are successfully paired with your PC, locate the speaker icon in the bottom left corner of the screen, usually found in the system tray.
3. Left-click on the speaker icon to open the volume control panel. Above the loudness toggle, you will see the current audio output device.
4. If your AirPods are already set as the output device, you’re all set! However, if they are not selected, click on the name of the output device.
5. A list of available output devices will appear. Find your AirPods within that list and click on them.
6. After clicking on your AirPods, Windows will take a moment to switch the audio output to your AirPods. Wait for the system to complete this switch.
7. Once the switch is complete, the audio output will be directed to your AirPods, and you can enjoy sound playback through them.
By following these steps, you can easily set your AirPods as the output device on a Windows 10 PC and start using them for audio playback.
How do I select AirPods as the audio output on macOS?
To select AirPods as the audio output on macOS, follow the steps below:
1. Click on the Apple menu located at the top left corner of the screen.
2. Choose “System Preferences” from the dropdown menu.
3. In the System Preferences window, click on the “Sound” icon.
4. A new window will open with various tabs. Click on the “Output” tab.
5. Here, you will see a list of available output devices. Look for your AirPods in the list.
6. If your AirPods are already connected and nearby, they should appear as an option.
7. Click on your AirPods to select them as the audio output device.
8. Once selected, you should start hearing audio from your Mac through your AirPods.
It’s important to note that if your AirPods are not connected or not within the Bluetooth range of your Mac, they will not appear in the list of available output devices. Make sure your AirPods are properly paired with your Mac before attempting to select them as the audio output.
How do I disable “Automatic Ear Detection” on macOS?
To disable “Automatic Ear Detection” on macOS, navigate to the System Preferences.
First, locate and open the Bluetooth settings. This can be found by clicking on the Apple menu at the top left corner of the screen, selecting “System Preferences,” and then choosing “Bluetooth.”
Once in the Bluetooth settings, you will see a list of paired devices. Look for your AirPods in this list and click on the “Options” button next to them.
A new window will appear with several options related to your AirPods. Find the checkbox labeled “Automatic In-Ear Detection” and uncheck it.
After unchecking the box, simply click “Done” to save the changes and close the window.
By following these steps, you have successfully disabled “Automatic Ear Detection” for your AirPods on macOS.
How do I forget my AirPods on macOS?
To forget your AirPods on macOS, follow these steps:
1. Open the “System Preferences” on your Mac.
2. In the “System Preferences” window, locate and click on the “Bluetooth” icon.
3. Once in the “Bluetooth” settings, you will see a list of devices that are currently paired with your Mac.
4. Find your AirPods in the list of devices and right-click on them.
5. From the context menu that appears, select the option that says “Remove.”
6. A confirmation prompt will appear, asking if you really want to remove the AirPods. Confirm your choice by selecting “Remove” again.
7. Your Mac will now forget the AirPods and they will no longer be paired with your computer.
Following these steps will ensure that your AirPods are successfully forgotten and no longer connected to your macOS device.
How can I resolve sound issues caused by using an Apple Watch?
To resolve sound issues caused by using an Apple Watch, there are a few steps you can take. Firstly, check if your watch is using too much Bluetooth bandwidth, which could be affecting the connection with your AirPods. To address this, you can try placing the watch into Airplane mode. This action limits the data transferred from your phone, allowing for uninterrupted Bluetooth connectivity with your AirPods. However, it’s important to note that enabling Airplane mode will also disable push notifications on your Apple Watch. By following these steps, you may be able to mitigate sound issues and improve the overall audio experience when using your Apple Watch and AirPods.
How can I check the battery status of my AirPods?
To check the battery status of your AirPods, you can follow these steps:
1. Make sure your AirPods are connected to your device.
2. Open the charging case lid, but do not remove the AirPods.
3. On your iPhone, go to the home screen and swipe down from the top-right corner to access the Control Center.
4. In the Control Center, you will see a set of icons representing various features and settings. Look for the icon that resembles a pair of headphones with sound waves.
5. Tap on this headphone icon to access the audio options. A new window will appear displaying the battery percentage for your AirPods, as well as the charging case if it is currently open.
6. The battery percentage will be shown for both the left and right AirPods, along with the charging case if applicable.
7. You can monitor the battery percentage of your AirPods regularly to ensure they have enough power for your usage needs.
If you find that the battery percentage is low, it is recommended to leave the AirPods to charge for at least 30 minutes. If you encounter any issues with charging, you can refer to our separate guide on fixing AirPods not charging.
How can I prevent my AirPods from automatically connecting to other devices?
To prevent your AirPods from automatically connecting to other devices, it is important to disable the Bluetooth feature on all iOS devices that are not being actively used. By ensuring that Bluetooth is turned off on unused devices, you can effectively prevent your AirPods from automatically connecting to them. This will allow you to have more control over which devices your AirPods connect to and avoid any unwanted or unintended connections.
How can I ensure that my AirPods are set as the output device on my iOS device?
To set your AirPods as the output device on your iOS device, follow these steps:
1. Begin by swiping down from the upper right corner of your screen to access the Control Center.
2. In the Control Center, locate the music playback widget. You can find it by looking for the widget that displays information about the song you’re currently listening to.
3. Long press (or use 3D touch) on the music playback widget to reveal additional options and settings related to audio outputs.
4. Look for the symbol that resembles a triangle with three circular stripes. It should be located somewhere within the music playback widget.
5. Once you’ve found the triangle symbol, tap on it to open the audio output menu.
6. In the audio output menu, you should see a list of available output devices. Look for your AirPods in the list and tap on them to select them as the output device for audio playback on your iOS device.
By following these steps, you can ensure that your AirPods are set as the output device on your iOS device, allowing you to enjoy your audio content wirelessly and privately through your AirPods.
How can I troubleshoot my AirPods when they are connected to iOS and Android devices?
Certainly! Here are some troubleshooting steps to help you resolve issues with your AirPods when connected to iOS and Android devices:
1. Restart your AirPods: Start by placing both AirPods back into the charging case and closing the lid. After a few seconds, open the lid and take the AirPods out. This action will force them to turn off and reconnect to your Bluetooth device.
2. Reset your AirPods: Perform a full reset of your AirPods to fix any potential bugs. Place both earbuds in the charging case and close the lid. On your iOS device, go to Settings > Bluetooth, find your AirPods, tap the “i” icon, and select “Forget This Device.” Open the lid of the charging case and hold the button on the back of the case until the LED light flashes in amber and white. This indicates that the AirPods have been successfully reset. They should now go into pairing mode, and you can reconnect them to your device.
3. Turn Bluetooth off and on: Toggle the Bluetooth setting off and on on your device to reestablish the connection with your AirPods.
4. Set AirPods as the output device: Sometimes, your device may prioritize a different audio output. On an iOS device, swipe down from the upper right corner to access Control Center, long-press (or use 3D touch) the music playback widget, tap the audio outputs icon (often a triangle symbol with three circular stripes), and select your AirPods as the output device.
5. Troubleshoot one AirPod playing: If only one AirPod is playing, try switching the audio output to your device and then back to your AirPods. This step often helps when using true wireless earbuds.
6. Prevent automatic connection to another device: If your AirPods are automatically connecting to other devices, such as an iPad, ensure that Bluetooth is turned off on all iOS devices that you are not actively using.
7. Disable automatic ear detection: If your AirPods stop playing music unexpectedly due to the automatic ear detection feature, disable it. Connect your AirPods to your iPhone, go to Settings > Bluetooth, find your AirPods under “My Devices,” tap the “i” icon, and toggle off the “Automatic Ear Detection” feature.
8. Restart your iPhone: In case your iPhone has Bluetooth problems, try restarting it. This can help eliminate any related variables without performing a factory reset.
9. Reset network settings: If settings related to Wi-Fi or Bluetooth interfere with each other, resetting your device’s network settings can help. This will remove all Wi-Fi networks and Bluetooth connections along with VPN settings. Navigate to Settings > General > Reset, and select “Reset Network Settings.” Enter your password, and allow the device to complete the process.
10. Check volume limit and audio balance: Make sure your AirPods’ volume limit is set to “Off” by going to Settings > Music > Volume Limit and sliding the slider to the maximum position. Additionally, verify that the audio balance is centered by accessing Settings > Accessibility > Audio/Visual and ensuring the slider is in the middle position.
11. Check battery status: If one AirPod is not working properly, it could be due to low battery. Charge your AirPods for at least 30 minutes and check if the issue persists.
12. Clean your AirPods: Sometimes, a buildup of ear wax or dirt on the speaker grill can affect the sound quality of your AirPods. Regularly clean your AirPods to ensure optimal audio performance.
13. Check for interference with other devices: Some users have reported issues when using Bluetooth trackers or Apple Watches alongside their AirPods. These devices may consume excessive Bluetooth bandwidth, causing audio drop-offs. Ensure that all these devices are updated with the latest software to minimize interference.
14. Place Apple Watch in Airplane Mode: If you experience issues specifically while using an Apple Watch, try enabling Airplane mode on the watch. This action reduces data transferred from your phone, allowing a more uninterrupted Bluetooth connection with your AirPods. However, note that this will also disable push notifications on your Apple Watch.
15. Update AirPods firmware and iOS: Firmware updates can resolve existing problems, so it’s crucial to keep your AirPods and iOS devices up to date. For AirPods, the firmware updates occur automatically in the background. To update your iOS device, navigate to Settings > General > Software Update and install any available updates. Updating firmware is not possible on Android devices unless you use a friend’s iPhone to help you with the process.
By following these troubleshooting steps, you should be able to address common issues and ensure optimal performance of your AirPods when connected to iOS and Android devices.
How can I clean my AirPods to improve their sound quality?
What should be done if gunk and ear wax build-up are found on the AirPods?
If gunk and ear wax build-up are found on the AirPods, they simply need some cleaning. You can learn how to clean your earbuds to remove the build-up and improve the sound quality.
How can one identify if there is gunk and ear wax build-up on the AirPods?
To identify if there is gunk and ear wax build-up on the AirPods, you can inspect the speaker grill for any visible layer of hardened ear wax and dirt.
What could be the reason behind the AirPods appearing quieter and worse sounding?
The reason behind the AirPods appearing quieter and worse sounding might not be because they are getting worn out, but rather due to the presence of gunk and ear wax build-up on the speaker grill.
How does a layer of hardened ear wax and dirt over the speaker grill affect the sound quality of AirPods?
A layer of hardened ear wax and dirt over the speaker grill can make your AirPods appear quieter and worse sounding, affecting the overall sound quality.
Clean your AirPods
When was the last time you properly cleaned your AirPods? By properly, I don’t mean wipe your AirPods with a T-shirt or any cloth within your reach. You must clean them properly so that you do not damage them. Apple explains how to clean your beloved AirPods the right way.
But wait, there’s more to it! Cleaning your AirPods not only helps maintain their hygiene but can also significantly improve their sound quality. Over time, a layer of hardened ear wax and dirt can accumulate over the speaker grill, making your AirPods appear quieter and worse sounding.
So, if you’ve noticed a decline in the audio performance of your AirPods, before assuming they are wearing out, give them a thorough cleaning. Take a closer look and inspect for any gunk and ear wax build-up. If you spot any, it’s time for a proper cleaning session.
To learn how to clean your earbuds and get them back to their optimal sound quality, follow Apple’s instructions. They provide step-by-step guidance on cleaning your AirPods without causing any damage. By following these cleaning methods, you can remove the dirt and ear wax build-up, bringing back the clarity and richness to your audio experience.
Remember, a simple cleaning routine can go a long way in maintaining the performance of your AirPods. So, take a few minutes to clean them properly and enjoy the full potential of your beloved wireless earbuds!
How can I check and adjust the volume limit on my AirPods?
How do I center the audio balance on my AirPods?
To center the audio balance on your AirPods, go to the “Settings” app on your iPhone. Then, tap on “Accessibility” and select “Audio/Visual”. Locate the “Balance” section and adjust the slider to the middle position. This will ensure that the left and right channels are balanced.
How do I check the audio balance on my AirPods?
To check the audio balance on your AirPods, access the “Settings” app on your iPhone. Next, tap on “Accessibility” and then choose “Audio/Visual”. Under the “Balance” section, make sure the slider is in the middle to ensure that the left and right channels are balanced.
How do I adjust the Volume Limit on my AirPods?
To adjust the Volume Limit on your AirPods, follow these steps: Open “Settings” on your iPhone, tap on “Music”, then select “Volume Limit”. From there, you can adjust the slider to your desired maximum volume level.
How do I check if the Volume Limit is turned off on my AirPods?
To check if the Volume Limit is turned off on your AirPods, go to “Settings” on your iPhone, then tap on “Music”. From there, locate “Volume Limit” and ensure that the slider is set to the maximum position, which turns off the volume limit.
To check and adjust the volume limit on your AirPods, you can follow these steps:
1. Start by ensuring that the volume limit setting is not restricting the maximum volume level you can hear. By default, this setting is turned off, but it’s worth checking to make sure it hasn’t been accidentally set too low. You can find this option in your iPhone’s settings.
2. Open the Settings app on your iPhone and scroll down to find the “Music” option. Tap on it to access the music settings.
3. Within the Music settings, locate the “Volume Limit” option. This is where you can control the maximum level of volume. Tap on it to open the volume limit settings.
4. Once you’re in the Volume Limit settings, you can adjust the slider to the maximum position. This will ensure that the volume limit is turned off, allowing you to enjoy the maximum volume level from your AirPods.
It’s important to note that if you prefer to have a volume limit, you can adjust the slider to your desired level instead of turning it off completely.
In addition to checking the volume limit, it’s also a good idea to verify the audio balance. This ensures that the sound is evenly distributed between the left and right AirPods.
To do this, follow these steps:
1. Open the Settings app on your iPhone and scroll down to find the “Accessibility” option. Tap on it to access the accessibility settings.
2. Within the Accessibility settings, locate the “Audio/Visual” option. Tap on it to open the audio and visual settings.
3. Under the “Balance” section, you can adjust the slider to ensure that the left and right audio channels are balanced. Make sure the slider is positioned in the middle for an equal distribution of sound.
By following these steps, you can thoroughly check and adjust both the volume limit and audio balance settings on your AirPods, ensuring an optimal audio experience.
Madison
Saturday 9th of April 2022
its still not working, and I FOUND these!
Madison
Saturday 9th of April 2022
any tips on what to do?