Did you buy a new pair of Bose headphones with active noise cancellation and want to pair them to your Mac? or perhaps you’re having trouble locating your headphones in the Bluetooth settings? In this quick guide, let us show you how to connect Bose headphones to Mac in just 2 minutes.
Whether you have a Macbook Pro/Air, an iMac, a Mac Mini, or a Mac Pro, you’re probably wondering if you can connect your new Bose headphones without dealing with extra software or tech-savvy instructions.
The answer is YES. You can do this quite easily, although some people have reported problems occasionally, so we’ll also cover that.
When you get a new pair of headphones, you can usually connect them to any smartphone or tablet using the “Bose’s Connect” app. However, when you try to connect them to your Mac or any PC, you can do this without downloading any drivers or extra software via your Bluetooth settings, as long as your computer supports Bluetooth.
How to connect Bose Headphones to Mac – Step by Step
To pair your Bose headphones to your Mac OS profile, just login into your computer and follow these steps:
1. Open System Preferences
In any Mac and no matter which OS version you’re using, you can always open your system preferences by clicking the Apple logo in the top left corner of your screen and then clicking on “System Preferences“:

You can also locate the system preferences icon in the Dock Bar if you didn’t hide it from showing there before.
2. Go to Bluetooth settings
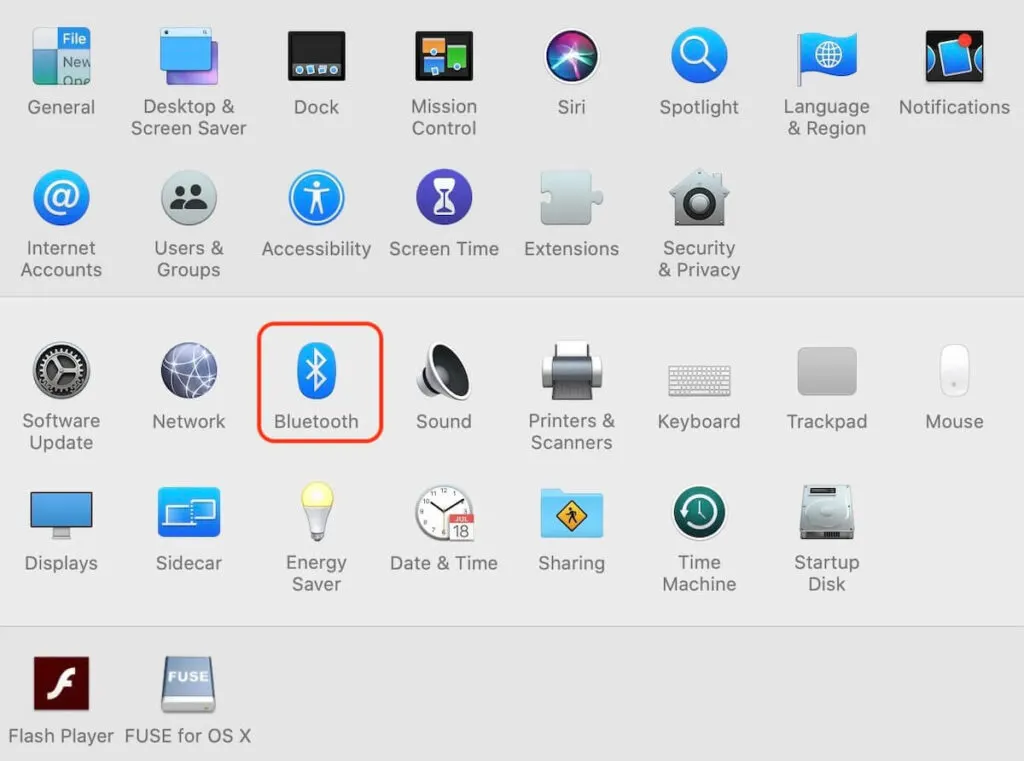
Once you’re inside the System preferences menu, locate the Bluetooth icon as shown below and click on it to open “Bluetooth preferences“:

3. Make sure Bluetooth is on
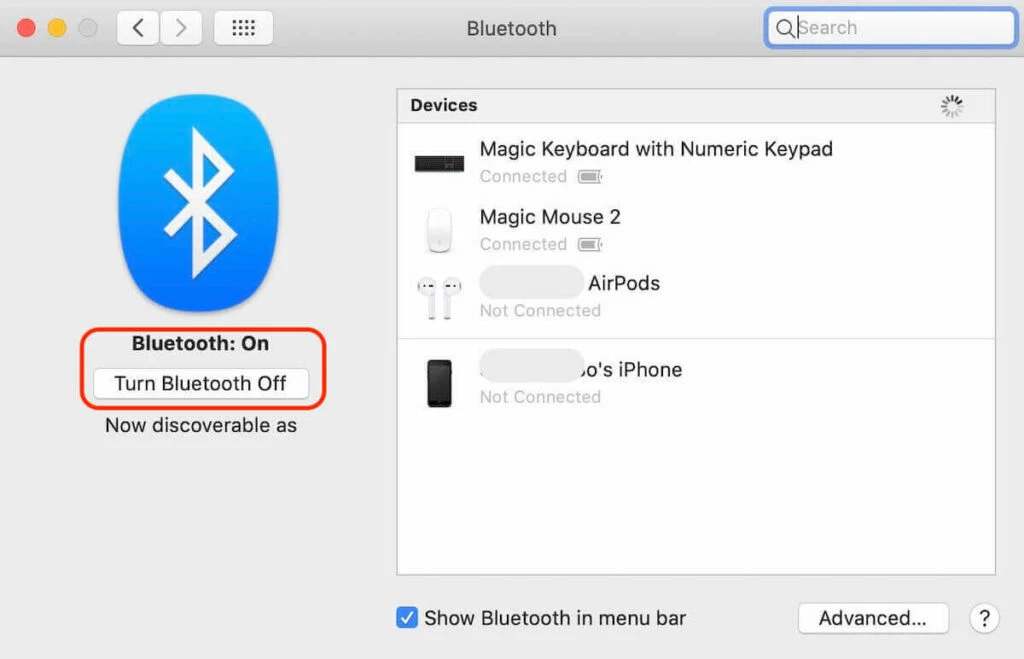
Before anything else, ensure your Bluetooth connection is ON; if not, enable it.

You’ll also be able to check which devices are currently connected via Bluetooth to your Mac. Standard devices connected via Bluetooth are the Magic Keyboard, Magic Mouse, the Trackpad, your iPhone, and even your AirPods.
4. Put your Bose headphones in pairing mode
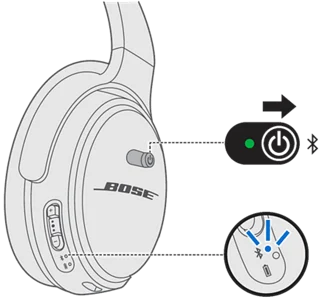
Once you are ready, slide the power switch of your headphones to the Bluetooth symbol until the Bluetooth indicator starts blinking in blue color. Some headphones might have a different color or way to enable the Bluetooth pairing mode; if so, check the manual or any extra buttons to enable it.

5. Connect your Bose headphones to your Mac
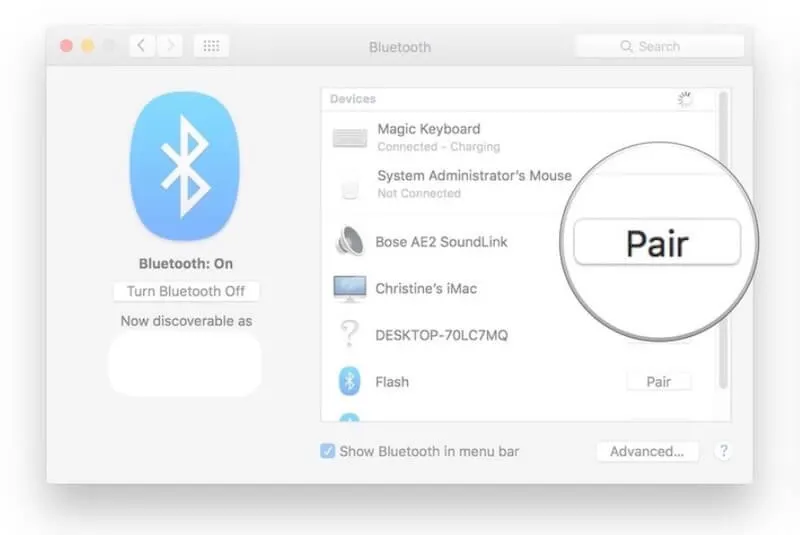
Once your Bluetooth headphones are in pairing mode, you’ll be able to see them in your Bluetooth settings on your Mac. It should take a few seconds to appear.

Once you see them, click the “Pair” button, and the profile will be created automatically. From now on, you can connect them directly from your upper taskbar in the Bluetooth and audio settings, or they will connect automatically once you switch them on anywhere near your Mac computer.
That’s it! Your Bose headphones are now connected and ready to work with your Mac. Set up your Mac’s equalizer according to your music taste.

What if my computer asks for a code?
Sometimes you must input a PIN to confirm the Bluetooth pairing with your headphones. If this happens, type 0000 and click OK to continue. That should do the trick. This process can often occur with Bluetooth speakers like the Bose Soundlink or Soundlink Revolve.
What if my headphones aren’t appearing?
Sometimes this method works flawlessly, but some people ask in forums about their headphones not appearing available for pairing. If that’s your case, close the Bluetooth settings, open them again, and see if that works.
If not, turn off your headphones, turn them on again, and put them in pairing mode. If the problem persists, it could be due to your headphones’ full Bluetooth memory profile list. In that case, you’ll need to completely reset your headphones to delete all the profiles and start with them as a new device.
Now follow the whole tutorial again, and this time you should be able to see and pair your Bose headphones to your Mac. Enjoy your new headphones!
Is the Bose Connect app available for Mac?
No, the Bose Connect app is not available for Mac devices. It is specifically designed for use on iOS and Android operating systems only.
How do I customize the settings of Bose headphones on a Mac?
To customize the settings of your Bose headphones on a Mac, please follow these steps:
1. Begin by connecting your Bose headphones to your Mac using the appropriate cable or by pairing them via Bluetooth.
2. Open the System Preferences on your Mac. You can do this by clicking on the Apple menu in the top-left corner of your screen and selecting “System Preferences” from the drop-down menu.
3. In the System Preferences window, locate and click on the “Sound” icon. Alternatively, you can access this menu by clicking on the Bluetooth icon in your menu bar, hovering over the name of your Bose headphones under “Devices,” and then selecting “Open Sound Preferences.”
4. Once you are in the Sound preferences, you can customize various aspects of your Bose headphones’ settings.
– Sound Effects: Click on the “Sound Effects” tab to adjust the sound you receive for alerts. Here, you can select different alert sounds by highlighting the name and adjusting the volume using the indicator on the Alert volume bar. To preview a sound, simply double-click on its name.
– Output: Click on the “Output” tab to adjust the balance and output volume of your Bose headphones. You can use the toggle bars to set the desired balance between the left and right audio channels and to adjust the overall output volume.
– Input: Switch to the “Input” tab to adjust the input volume and settings for your Bose headphones’ microphone, if applicable. You can fine-tune the input volume by moving the toggle left or right. Additionally, double-click on the microphone icons to turn the input level up or down. Make sure the input level is not turned down entirely if you intend to use the built-in microphone on your Bose headphones.
5. Once you have made the desired changes to your Bose headphones’ settings, close the Sound preferences window.
By following these steps, you can readily customize the settings of your Bose headphones on your Mac to ensure an optimal audio experience.
David Inglis
Saturday 25th of June 2022
A good bit of advice for ease of pairing.