FaceTime is one of the most popular video-calling apps in the world. Millions use it daily to stay in touch with friends and family. But what if you want to record a FaceTime call? Maybe you need to capture a business meeting or record a tutorial. Whatever the reason, recording a FaceTime call isn’t rocket science. This article will show you how to record FaceTime with audio on all major platforms: iPhone, iPad, and Mac!
Before moving on to recording
We know there are a lot of individuals who want to know how to record FaceTime audio. However, you should know that Apple has deactivated this feature to safeguard other people’s privacy, but there is a workaround.
You can record FaceTime for an iPhone and a Mac; we are going over the process in great detail. Follow the following procedures to record a face-to-face conversation on your iPhone or Mac.
How to record FaceTime with audio on iPhone?
The iPhone is the most popular device for FaceTime, so it’s not surprising that there are a few different ways to record calls on an iPhone. We’ll start with the easiest method.
- Launch Facetime and begin a conversation.
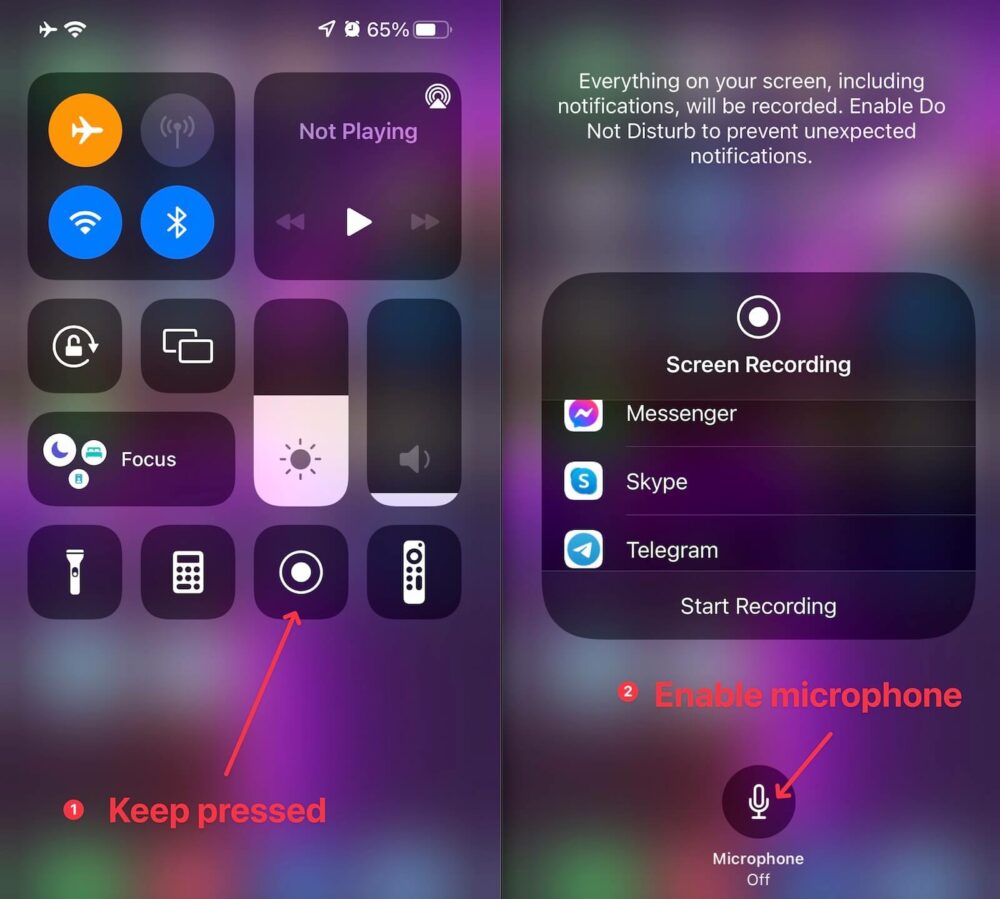
- Swipe up to open “Control Center.” NOTE: In the control center, you’ll find many shortcuts for airplane mode, WIFI, and music. If you wish to alter the shortcuts, click “Customize Controls” and edit them.
- Tap the “Screen Recording” option until the microphone activation option appears and enable it. This option catches noises from your microphone (here’s where the microphone is located on iPhone 11), and you’ll need to adjust the volume settings to get a better sound.
- Click the “start recording” option. A recording status in red will appear on the top left of your screen for convenient access. Tap the “Status Bar” and select the “Stop” button in the dialogue box once the recording is finished.
- Bringing up (or down) the “Control Center” is another way to cease screen recording.

You’ve successfully recorded FaceTime with audio on your iPhone; now open your gallery or images app to see the recorded files.
How to record FaceTime with audio on an iPad?
iPads use a similar operating system to iPhones, so the recording process is very similar. An iPad is ideal for FaceTime because of its large screen size.
Here’s how to record a FaceTime call on an iPad:
- Open the Facetime application and initiate a call.
- Swipe up from the iPad screen below to open the “Control Center.”
- Hold down the “Screen Recording” option until the “Turn on Microphone” option appears and enable it. This feature catches noises from your microphone, and you’ll need to adjust the volume settings to get a better sound.
- Start recording. A recording status in red will appear on the upper left of your screen for quick access to recording settings.
- When the recording is finished, hit the “Status Bar” and choose “Stop” from the dialogue box.
- Opening up the “Control Center” is another way to cease screen recording.
You’ve successfully recorded FaceTime on your iPad; Following the same procedure as your iPhone, open your photographs or gallery app to see your recorded files.


Now that we’ve gone over how to record FaceTime with audio on two different mobile devices, we’ll move on to how to do it on a Mac.
How to record FaceTime with audio on Mac?
Mac OS is a computer operating system instead of a mobile one like iOS. Consequently, Mac’s recording process is different from an iPhone or iPad.
You can also record audio in multiple ways with a Mac, but we’ll cover how to do it with QuickTime, a pre-installed program on all Macs.
To capture audio on your Mac, follow the steps below:
- Before recording videos on your Mac, make sure QuickTime is installed. By default, QuickTime is included with every Mac OS installation.
- Open QuickTime and choose “File.”
- Select “New Screen Recording” from the drop-down menu and wait for a pop-up window to appear.
- Next to the record button, click the drop-down arrow.
- Select the device you’re using in “Microphone.” For example, your microphone on a MacBook Air.
- Launch the FaceTime program.
- In QuickTime, press the red record button.
- To record a call, click the FaceTime window or your desktop’s background if you wish to record the entire screen.
- Start your call, and you’ll be good to go!
Congratulations. You have successfully learned how to record FaceTime with audio on Mac.
The bottom line
It’s time to wrap things up! Our social interaction applications will continue to improve as time goes on. Hopefully, Apple will soon bring a recording feature to the FaceTime app as long as it keeps the callers’ privacy in mind.
Now that you know how to record FaceTime with audio, you can use the abovementioned ways to keep in touch with your loved ones and create beautiful memories. Share these hints with your family and friends so they can enjoy these hidden features.
Let us know how it goes in the comments below, and feel free to ask any questions you may have.